What model should I install in my home?
How much CFM is needed for my home?
Where can a residential ERV be installed inside a home?
What should I set my PTL/FM percentage timer to?
What duct size do I run?
Why is the variable speed not working with this ECM ERV?
Where can I buy a filter for a RenewAire unit?
How do I adjust the cycling on my IR33 Frost Control?
The frost controller employs a setpoint (St1) and differential (P1) for cycling the supply fan for frost control. The relationship is shown in the following figure, where the frost control begins as the temperature falls below the setpoint minus differential, and turns back off at setpoint. The differential P1 is defaulted to 2 but can be increased to minimize cycling.

How do I integrate RenewAire ERVs with Mitsubishi VRF systems?
How to Troubleshoot an Offline c.pCOe Controller
How to Connect to a Carel Controller via Ethernet
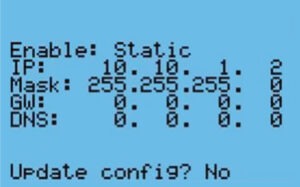
How do I get the IP address to stay in this Carel controller?
Note: In control versions 3.x and higher this can be done in the general settings menu.
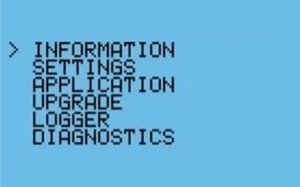
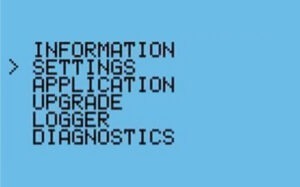
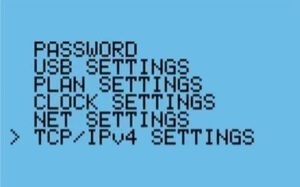
Press and hold the Alarm and Enter buttons on the Carel controller to bring up the hidden menu. The second option should be Settings. If not, press Escape once. Go to settings and then TCP/IPv4 Settings. Set the IP address and then cycle power to the unit.
Where do I connect the BMS to this Carel controller for BACnet MSTP?
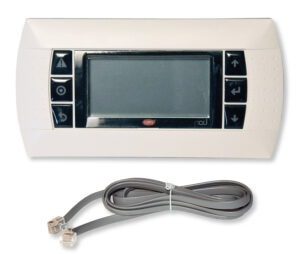
Where do I buy Carel RUT cables of different lengths?
While the Carel RUT includes a standard 5-foot cable, your specific application may require a longer connection. Specifically, these cables utilize a unique internal wiring configuration where two wires are swapped; consequently, standard phone cords will not work with this system.
Although RenewAire does not stock these individual items, you can purchase cables up to 150 feet directly from CarelParts.com. To ensure compatibility, please refer to the specific part numbers listed below:
Carel Part Numbers
| Part Number | Description |
| S90CONN002 | 6 wire phone cord connector, 2.5 ft |
| S90CONN000 | 6 wire phone cord connector, 5 ft |
| S90CONN001 | 6 wire phone cord connector, 10 ft |
| S90CONN003 | 6 wire phone cord connector, 20 ft |
| S90CONN004 | 6 wire phone cord connector, 35 ft |
| S90CONN005 | 6 wire phone cord connector, 50 ft |
| S90CONN006 | 6 wire phone cord connector, 75 ft |
| S90CONN007 | 6 wire phone cord connector, 150 ft |
If your installation requires a direct connection to the four-pin J3 connector rather than the standard jack, you must follow a specific wiring sequence. Specifically, connect the six-wire cable to the J3 pins as follows:
Blue + White to +Vterm
Yellow + Black to G
Green to (+)
Red to (-)